Monday, March 19, 2012

Challenge 44 - Spring

Our Outlines Monday challenge theme this week is to.....

create something with the theme of SPRING.

We would like you to join this challenge for a chance to win a $25 Shopping Spree at Outlines Rubber Stamp Co.  To enter the challenge you must use only stamps from Outlines; only one entry allowed  Please add the URL to your actual blog post or online gallery to the InLinkz you will find at the end of this post. Please do not link to your main blog.  Also, please link back to our challenge in your blog post  or gallery..

So let's see what our design team has created for you this week.


Challenge 43 - Easter Winner

Using Random.org a winner was chosen from last week's
Easter Challenge:


Random Integer Generator

Here are your random numbers:
4 
Timestamp: 2012-03-19 01:58:17 UTC

Congratulations to Tera!


Please contact us for your winning prize of a $25 shopping spree at Outlines Rubber Stamps. And thank you to everyone who joined in on the challenge. We hope to see you again this week.

Monday, March 12, 2012

Challenge 43 - Easter

Our Outlines Monday challenge theme this week is to
create an Easter themed card or project. 

We would like you to join this challenge for a chance to win a $25 Shopping Spree at Outlines Rubber Stamp Co.  To enter the challenge you must use only stamps from Outlines; only one entry allowed  Please add the URL to your actual blog post or online gallery to the InLinkz you will find at the end of this post. Please do not link to your main blog.  Also, please link back to our challenge in your blog post  or gallery..

So let's see what our design team has created for you this week.
Stamps used: H-929 Easter Egg


Challenge 42 - March Sketch Challenge WINNER

Using Random.org a winner was chosen from last week's
March Sketch Challenge:


Random Integer Generator

Here are your random numbers:
5 
Timestamp: 2012-03-12 03:07:03 UTC

Congratulations to Michelle W!

Please contact us for your winning prize of a $25 shopping spree at Outlines Rubber Stamps. And thank you to everyone who joined in on the challenge. We hope to see you again this week.

Friday, March 9, 2012

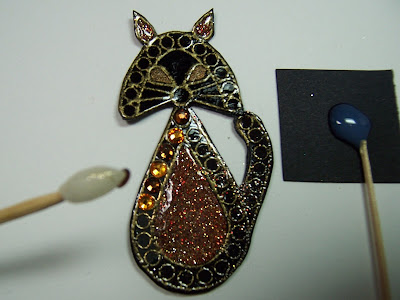
Cute Cat Pins


Hi all,
Mandy did the Indiana show and demonstrated jewelry.  I don't know what they were most curious about at this show but I do know at the Atlanta show there was a lot of interest in Cleopatra, our cat jewel stamp.  There were a few tips I was trying to get across, but did not have the proper sample set-up, so I made one to take with me to the next show.  I'm sharing them today and hope they will be helpful for the cat and other related projects.  I'll probably be doing a few more jewel blogs in the next few weeks.  I want to excuse myself right now for my color choices.  I'm such a earth tone person that it is really hard for me to deviate!

The following goes against the instructions we usually give for jewel instructions but most of our other jewelry projects do not have center areas that need cutting out and larger areas that don't call for crystals.  So, here goes.......

Stamp and emboss your cat on one piece of smooth black cardstock, then stamp another image on another piece before gluing them together.

Cut away with exacto the area shown.  If you glue them together first as we normally do it will be more difficult to cut.

Now glue the two pieces together, doubling the paper will make it stronger and more durable.


Paint your cat's belly.  Paint the ears and eyes if desired, there's a lot of flexibility in creating the look of the cat.  I used LuminArte Indian Copper and Bronze Medallion. You could stop here and build up the belly with a few layers of Crystal Lacquer.

We are going to give the belly a really great look by glittering it and putting Crystal Lacquer over it.  I used a Quickie Glue Pen and Tree Bark Glitter from Art Institute.  Both of these products we carry on on website.

Spread crystal lacquer over the entire project--front and back. This again, is to make it durable and to give a more finished look.


Cut the cat out.  Add 1 or 2 more layers of crystal lacquer to the belly to give it dimension. This gives a very jewel like look. Hint.......brighter colors will look even better.


Add crystals in the usual manner by dabbing Crystal Lacquer in the openings for them and use our Pixie Pick-ups to transfer them.  You probably can't tell on the photo, but I used 2 different colors of
crystals (Topaz and Smoked Topaz).  This gives it a little more of an interesting appearance.


Now for a great new tip and a great addition of depth.  The head was stamped again.  Follow all the basic instructions.  I'm now using a foam product to raise the head up.  You can find the foam sheets in the kid's section of you local craft store.  It goes by different names, but we'll just call it foam sheets.  Stamp the cat head on it and cut it out.  Glue to the back of the paper head and add it to the whole cat.  This gives a nice finished edge.  Previously we were using pieces of foam mounting tape which was white.  The black fun foam really gives a nicer finished edge.


I think I've decided that I like the look of an actual eye.  A number 5 black crystal was my choice this time.  I also made one with pearl pens instead of crystals and I like the look, less glitzy, if that's a look you might prefer.  I think enough is enough for this time!  I have a couple more tips for next week, but won't make it quite so lengthy!
~Kathy

Monday, March 5, 2012

Challenge 42 - March Sketch Challenge

Our Outlines Monday challenge theme this week is to follow this sketch to create your card.
Big thanks to Lisa Silver who designs our sketches!

We would like you to join this challenge for a chance to win a $25 Shopping Spree at Outlines Rubber Stamp Co.  To enter the challenge you must use only stamps from Outlines; only one entry allowed  Please add the URL to your actual blog post or online gallery to the InLinkz you will find at the end of this post. Please do not link to your main blog.  Also, please link back to our challenge in your blog post  or gallery.

So let's see what our design team has created for you this week...

Lisa is off this week and will be back next Monday!


Challenge 41 - St. Patrick's Day Winner

Using Random.org a winner was chosen from last week's
St. Patrick's Day Challenge:


Random Integer Generator

Here are your random numbers:
5 
Timestamp: 2012-03-05 01:57:08 UTC

Congratulations to Jane!

Please contact us for your winning prize of a $25 shopping spree at Outlines Rubber Stamps. And thank you to everyone who joined in on the challenge. We hope to see you again this week.

Wednesday, February 29, 2012

The Last Egg!!


Are you bored with eggs yet?  I promise it's the last one!  The reason I get so repetitious is that I keep finding new things to do with a project.  Sometimes it's playing with different products and sometimes I actually find better ways to make it work by the time I'm on my 3rd, 4th, or 5th one.  I like to share these tips.  Also, often these tips can be applied to other projects, especially with the Posies.  So here are a few are a few more tips!  If you want more specific instructions, go back to the  previous blogs: Feb. 10th and 24th.


Adding Flower Soft to the tips gives a new look.  I like it.  We carry mostly the Ultra-Fine Flower Soft.  It is just what it says, ultra fine, and goes on nicely in small areas.  Their colors are a little limited in the Ultra Fine, but we offer what they have.  However I just found out, rather late, that they added some new ones, including white (yeah).  These have been ordered and will be available as soon as we receive them.


Scoring the petals for a different look, again adds a new look.  I turn the Posy over and score it from the center down to the end of the petal, then pinch the petal together from the right side.  You can see the different look that is achieved.  You could also pinch the petal together the opposite way and get another look.  I also always score the petal around the center to make bending the petals easier.


I decided that these really need spacers between the petals.  On previous instructions I said I used bead caps which turns out was a bad move.  Just a little square of foam tape with a hole punched in the center with a hand held plier type punch works really well.  Add a few drops of glue or Crystal Lacquer to keep them securely in place.  They really like to twist and turn.  By the way, Dr. Scholl's small round corn pads work well but could get pricey.


I added a fourth layer at the top by using the smallest petal twice and cutting the tips off.  When you are doing other projects with the petals don't forget this.  You don't always have to leave the tips on them.


Just a little note about the wires from Flower Soft.  If you don't own them you need to!  They do all kinds of good things.  I used them for hanging the eggs and put some gold paint on them.  They are very pliable, they can be colored, or you can add dots of flower soft to them to add to a project.  I haven't done this  yet, but they will work well for antennae on butterflies.  I like working with these better than wire.

Enough for now!  I've got to get working on some jewelry for Mandy to take to the Indiana show tomorrow, so I had better get started!  You will see some great jewelry tips on next week's blog so check it out!
Kathy

Monday, February 27, 2012

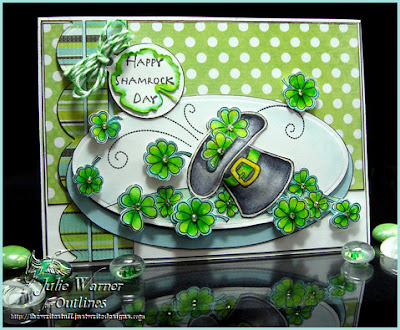
Challenge 41 - St. Patrick's Day

Our Outlines Monday challenge theme this week is to.....

make something with a St. Patrick's Day Theme

We would like you to join this challenge for a chance to win a $25 Shopping Spree at Outlines Rubber Stamp Co.  To enter the challenge you must use only stamps from Outlines; only one entry allowed  Please add the URL to your actual blog post or online gallery to the InLinkz you will find at the end of this post. Please do not link to your main blog.  Also, please link back to our challenge in your blog post  or gallery..

So let's see what our design team has created for you this week.

Challenge 40 - Make it Square! Challenge WInner

Using Random.org a winner was chosen from last week's
Make it Square Challenge:


RANDOM INTEGER GENERATOR

Here are your random numbers:
3 
Timestamp: 2012-02-27 02:01:47 UTC

Congratulations to Shirley!

Please contact us for your winning prize of a $25 shopping spree at Outlines Rubber Stamps. And thank you to everyone who joined in on the challenge. We hope to see you again this week.

Friday, February 24, 2012

More Eggs!

Hi!
I'm still on an egg kick. I'm having such fun creating these eggs that I can't stop!  As I go along I keep finding new things to do with them and tips that are helpful and I can't resist sharing.
My blog on Feb. l0 gives the basics for doing one of these.  I took my own advice and got creative
with combining different Posies and different papers.  I had mentioned about hanging beads which really add another dimension to them. I want to give you a few tips about adding them.
I did not have the color beads that I wanted, but I did have white pearls, so as you can see I colored them to match with Copic markers.
Before you cut you beads apart, look at the strip carefully and you will see that there is a thread that will unravel.  If this happens the beads will fall apart, so apply dabs of Crystal Lacquer or glue and let them dry before cutting apart.
After cutting them apart attach them to the underside of the bottom petal using Crystal Lacquer or glue.  I also decided that there needed to be a separator between the petals to give them a little lift.  I used some bead caps that I had hanging around. I glued them in place to keep the petals in place.
I always use a bead cap for the top to give a finished look. This time I added drops of  Pearl Pen to the top to finish it off.  The edges were painted with Smooch paint.

Enough for now!  I think I might have to do one more egg next week because there are still a few
more tips I'd like to share. See you then!