Monday, May 23, 2011

Outlines Challenge 1 - Make it Manly

Here at Outlines Rubber Stamp we are starting a weekly challenge and our theme this week is to.....

Make It Manly

We would like you to join this challenge for a chance to win a $25 Shopping Spree at Outlines Rubber Stamp Co.  To enter the challenge you must use only stamps from Outlines; only one entry allowed  Please add the URL to your actual blog post or online gallery to the InLinkz you will find at the end of this post. Please do not link to your main blog.  Also, please link back to our challenge in your blog post or gallery..

So let's see what our design team has created for you this week.

Thursday, May 5, 2011

Our NEW Posy Collage

Happy Spring!
I think spring has finally sprung and it feels really great after the winter we had! If only the lawn wouldn't need cutting so soon..... I love planting flowers and taking care of them even though it takes a lot of time, but cutting the grass is just not my thing! Probably the reason I worked on posies all winter was because I love flowers so much!


You may not have noticed the addition of the Posy Collage to our Posy series. It was inspired by our friend Michael Trent who did some beautiful projects with them. Michael used individual posies and masked them creating some beautiful projects. We took some of the work out of it for you and created a stamp with the posies already masked. Inspired by Michael Trent!


I used our Shimmer paper for this card, it's the one that allows you to pull colors when you use water soluble markers. For the large orange posy, use your best red, orange and yellow markers. Apply them as shown in the photo. Pull the middle section with your water barrel brush that has been filled with water. Then pull the red from the top into it. Try this with other colors, it's a great blending technique.


I choose to color in the background flowers with Copic markers because they color in the large open area so well. I didn't do any shading which kept the project simple.


Cut the petals out using an x-acto knife. Try not to cut all the way down between each petal, this will keep the lifted petal attached to the card.


Curl the petals up and attach to layered coordinating card stock. Add a bow.


Finally, use Viva's Glass Effect Gel on the center. This produces a glass like effect on the petal center.

Wednesday, April 20, 2011

Getting serious about Viva!

Hello, Hello, Hello!

Three hellos because as usual I've missed getting on here for way too long! Will I ever get better? Maybe not, but I will keep trying. My excuse now will be: the plants need planting, the weeds need weeding, the lawn needs mowing, etc, etc.! But it is sure nice to have spring in the works! Speaking of works, I've got a GREAT look in the works for our Posies. I can brag about it because it is truly all in the product. It is called Viva Modelling Cream. On my last blog, I teased you with a picture, but here are some basic directions.


Stamp one of each of Extra lg, Lg, Medium and Small sized Posy. Using compatible colors of ink and paper probably works best, but are not absolutely necessary. Cut away excess paper leaving a tab to hold on to. This tab will make working with the cream easier, so try not to forget it. Turn over and apply a light to medium coating of the Modelling Cream to the unstamped side of the paper with an off-set palette tool. This is going to look very messy, but not to worry!
Before the paint dries, pounce with a small wad of saran wrap to give it texture. You can leave this to air dry or dry it with a heat gun. Using the heat gun has two advantages: first it will dry immediately so that you can continue on and second, it will give it more texture.

Turn over and cut out leaving the tab on.

Apply Viva Holo Iridescent Glitter Liner to each petal. Put a dab on each petal and spread with your finder. Allow to air dry and cut tab off.
Shape petals by bending up at the center then curl over your finger in the opposite direction. The Modelling Cream makes the petals very durable and pliable. Layer the petals using 3-M mounting tape. Double the tape for more depth.

Make a center for your Posy. You can experiment with different ways to do this. Stamp out a few centers from your Posy and try Pearl Pens, crystals or a combination of both. Just a large gem in the middle looks great. A combination of two of our filigrees and a crystal gives them a really elegant look.


Another tip, since we only carry the filigrees in the gold color you may need to make the silver color if you desire silver. Spray paint does okay but one more Viva product does a great job, Inka Gold Paste. We carry it in silver and graphite. The graphite makes a good dark silver. I've posted several pictures of cards that I've done with these Posies to our website. Hopefully they will give you some ideas for creating your cards!

Monday, April 18, 2011

Blog Hop Winners!

Thanks to every one of you that participated in our Spring Blog Hop, introducing our new line of images "Serendipity Stamps"! We had two $25 gift certificates to give away for the Hop Prize! After checking off comments at each blog, the two random names that were selected are:

GrandmaLee (Lee Tucker)

and
Vickie Merrick

Congratulations to you both and Happy Shopping!
Please email Jenny at jennygropp@comcast.net, so she can set you up with your gift certificates!

Click here for instructions on the above card.


The Design Team is showing off Birthday themed cards today, be sure and use the links below to check out this week's card creations!

Bev Gerard
Jeanne Streiff
Jenny Gropp
Lisa Silver
Robin Kirkpatrick
Sandy Hulsart
Vicki Garrett

Monday, April 11, 2011

Outlines Spring 2011 Blog Hop!

This card features our new image #I-1144 Birdhome.

Welcome to our very first Blog Hop!

We are excited to introduce a newly designed line of images named "Serendipity"! The Design Team each picked an image and everyone is showing off something a little bit different. To celebrate this new release, we are giving away two gift certificates for $25. You can check out all the new stamps using this link: Serendipity Stamps by Outlines!


Here's how to win:

Please visit each blog and leave a comment for each designer on their Outline's card for this week. Comments need to be in by 8PM on Sunday, April 17th. Two random winners will be selected from folks that left comments on all the blogs. Winner's will be announced right here on Monday, April 18th. So be sure and check back next Monday!


Now... Where and who to go visit:

The order doesn't matter... just make sure you stop by them all! Happy Hopping!

Friday, March 11, 2011

Playing with Product!

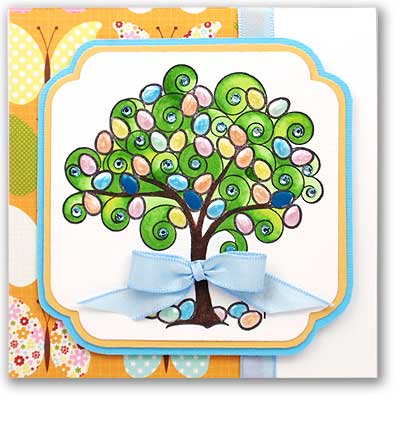
Hi! I'm just back from another show. This one was in Indiana, long ride but well worth it. We met a lot of nice people, some who knew of us and seemed really happy that we were there and some who had not heard of us and also seemed happy to discover us. We've been demonstrating our Jewel It stamps at most shows, people don't seem to get tired of it. Now we have those hot, hot Viva Pearl Pens to combine with the crystals and people are loving them! Take a look at the Easter Egg Tree Jenny did in the Weekly Card Ideas! It's a little hard to see in the picture, but the Pearl Pens make adorable 3-D eggs! This is another way the Pearl Pens are so versatile!


I've started using the Pearl Pens on the centers of our Posy series, they are a nice alternative to the crystals. I find the centers still need a crystal or two to pull it together, but the Pearl Pens work great on these.

By the way, the flowers that you see here have been created with a new product from the Viva people. It's fabulous! I'll share more about that soon!


These other little blobs you see on the wax paper are just that... blobs of Pearl Pen. They peel
right off the wax paper and you have little pearl gems to add to projects, any color or size that you need!

Saturday, February 19, 2011

Back from shows! CA, GA and FL in two weeks!

Once again I have not been in touch on a regular basis--but I will try again! My the time zips by! We got back last weekend from back-to-back shows. Starting with CHA in Los Angeles, then an Heirloom show in Atlanta followed by the next weekend at Stampfest by the Bay in Clearwater Florida. We also squeezed in 5 days in between at Disney! As you can guess, the grand-kids were with us . It was a whirl-wind. I think we have all just barely recouped and are trying to move forward. Got lots to do!

Here are the kids at the end of a very long week and a half! It's the end of the final show in Clearwater and time to get into the truck for a 22 hour drive! I'd say they held up pretty good!


Ella shows off our booth. I demo our Jewelry & Pearl Pens. It was great to see our customers!


We presented a new series at CHA in L.A. which will be launched on our website around the beginning of April. Watch for it, I think it's going to be great! Here's a sneak peak of one of the designs. It's a loose, fun series that is so easy to work with!
Debbie and I were the only ones at CHA so there wasn't as much time as we would have liked to spend time looking for new product. We did find some new papers and misc. items which will be added to our website soon. I spent a lot of my time in the Viva booth ( producers of Pearl Pens) learning about some of their other products. We've been using their pens mostly on our jewelry designs, but they complement many of our other stamps. I'm working with Posies and a new product from Viva. We're looking forward to bringing in new products soon.